
Now that you’ve installed your dedicated server (check out our How To article for setting up a dedicated server if you haven’t yet!), it’s time to look at some additions to make our server operate at full capacity.
MetaMod
MetaMod is a plugin interface for the Half-Life Engine. It allows the dynamic loading of mod-like DLL plugins to enhance your server. It’s essential to running SourceMod.
- Our first step is to go download the MetaMod: Source files. At the time of this writing, 1.10.4 is the most recent stable version.
- Open up the .zip file and extract the “addons” folder to your desktop for now
- If your server is on a remote server, connect via ftp to your directory. If the server is on a home computer, navigate to that directory.
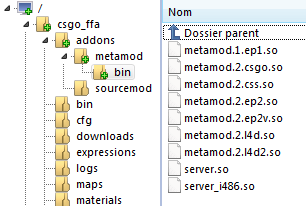
- Drop the “addons” folder you moved to your desktop in your main directory (csgo). You directory should look something like below:
- Now we need to create a .vdf file. Go to the following url:
- http://www.sourcemm.net/?go=vdf
- Select the game for MetaMod (CS:GO)
- Click Generate metamod.vdf
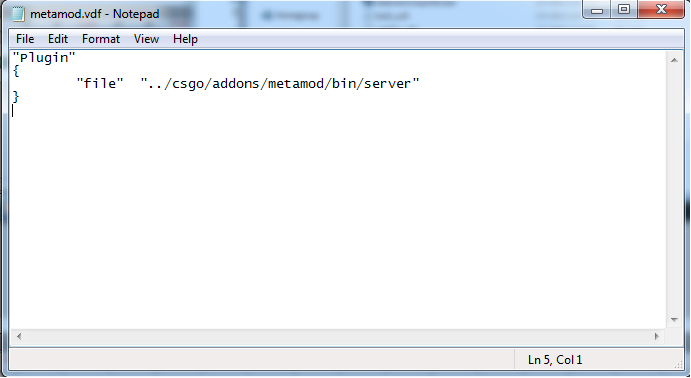
- We’re now going to place the metamod.vdf into the “<game>/addons” directory. Open the text file and make sure it looks like this:
- Restart your server then connect to it via the console. Type in “meta version”. The following message should appear “Loaded As: Valve Server Plugin.”
SourceMod
SourceMod is a high-performance scripting and administration platform for the Half-Life 2 Engines that allows for server modification. It is a powerful, highly optimized platform for scripting plugins and handling server administration. The community offers over 2,500 plugins for SourceMod.
The default features include the following:
- An easy to use, deeply fine-grained permissions system (SQL compatible)
- A highly configurable admin menu
- Reserved slots
- Flexible map management plugins (nominations, rock the vote, etc)
- Basic commands such as kicking/banning/slapping/muting players, changing cvars, etc
- Various voting commands
- Chat spam protection
- Comprehensive chat triggers for both users and administrators
- Easily translatable
- Now we need to go download SourceMod. The most current version at the time of this writing is .1.7.0:
- Unzip the two folder inside the sourcemod.zip file we just downloaded (should be “addons” and “cfg”)
- Connect to your server’s directory via FTP or navigate towards the folder on your home computer
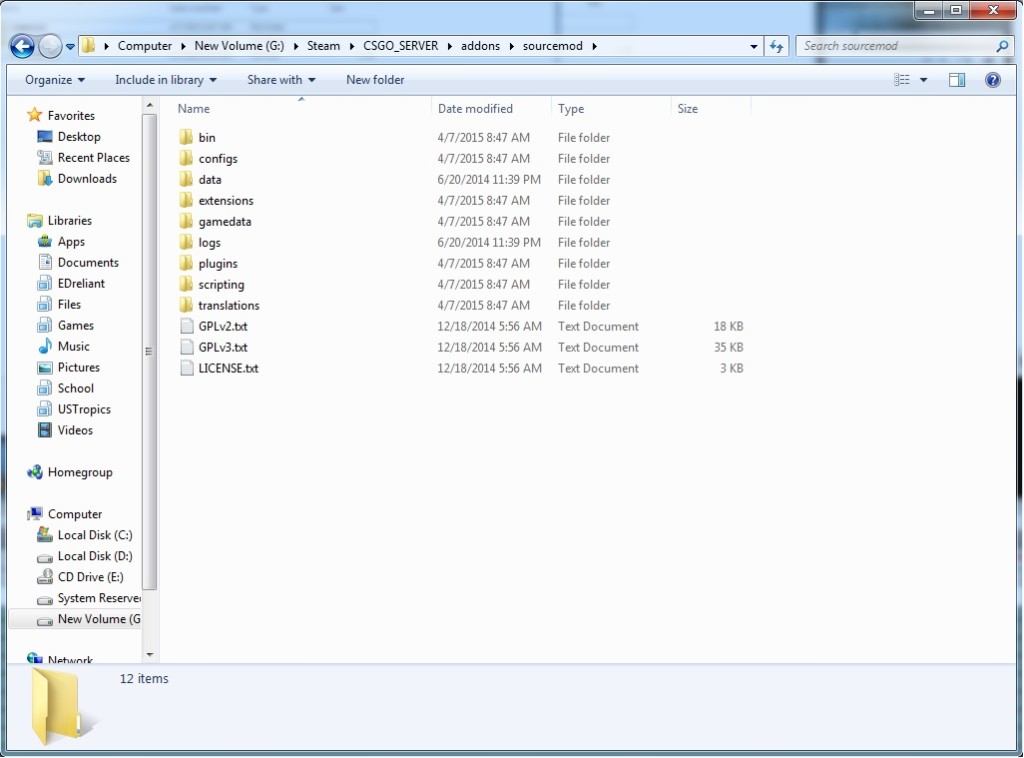
- Place the two folders into your server directory (there should already be an “addons” and “cfg” folder to merge these two folders with). Your “addons” folder should now look like the directory below:

- Now we need to let MetaMod know that it should load SourceMod. Open the MetaMod directory (inside the addons folder) and open the metaplugins.ini file with a text editor. At the bottom of the file add the following line:
addons/sourcemod/bin/sourcemod_mm - Now restart your server one more time. SourceMod should now be loaded. Your SourceMod directory should also resemble the one below:
Troubleshooting
So what if your server didn’t start properly or MetaMod/SourceMod is not functioning? Below are some helpful tips:
- Check to make sure all the files were downloaded correctly and that all files were uploaded to your directory correctly.
- Make sure you downloaded the correct version of MetaMod (there is a version for the Source engine and one for the Orange Box engine)
- If MetaMod is not running properly, make sure you have created a .vdf file and that it is for the correct game.
- If SourceMod is not running properly, make sure you have properly updated your metaplugins.ini file correctly.
- Lastly, if these steps don’t help, view the SourceMod Documentation for more advanced help